 |
 |
 |
 |
  |
|||
 |
 |
||
|
Virtual Hosts for Vulnerability Assessment
VMware Workstation is an extremely useful virtual host software suite designed for software testers and IT professionals that require to run multiple OS simultaneously on a single PC/laptop. Users can run Windows, Linux, NetWare, or Solaris x86 in fully network-able environment without the need to reboot and dual boot configurations. VMware also allow a user to take snapshots and revert back to these images to allow for product testing etc. It is available from VMWare.
I use VMWare as it is possible to to run multiple OS tools at the same time on the same laptop. It also allows me to build disparate OS to keep my hand in on the ins and outs of a possible OS I am (or due) to test. Its only this hand-on time that really gets you to know a particular OS. (In saying that I find Microsoft Virtual PC easier to configure for Sun Solaris builds!!).
VMWare also now do a product called VMWare player which although it won't allow you to build a VM it will allow you to play them, so if you can get hold of a decent VM and have no licence you can still at least use them with this free player.
I have got used to using RedHat and of course now Fedora Core. I won't say I'm an expert, but I get by and I think its best to stick with what you know rather than diversifying and possibly coming across a whole new set of problems.
Install Procedure:
Select Linux and other 2.6 Kernel Select 5Gb as the maximum size
Insert FC4 DVD Select start the virtual machine Select graphical install Skip DVD Media check (Just wastes time) Accept all defaults unless mentioned below: Workstation Configuration Select Custom Partitioning Select Manual Partitioning with the following partitions to be created: Mount point File system type Size /boot ext3 124 MB swap N/A 512 MB /home ext3 1000 MB / ext3 3000 MB
Boot Loader - Accept default of Grub Boot Loader - Select Boot Loader password option and insert password
Network Configuration - Select edit and deselect DHCP and insert valid LAN address. Insert Hostname as required
Firewall Configuration - Enable firewall (This laptop should be further locked down later utilising TCP wrappers xinetd and the removal of unwanted services).
Language Configuration - Highlight English (Great Britain) and set this also to the default.
Time Zone - Select Europe (London)
Root Password - Supply a strong password Package Configuration - Accept the defaults except for the following packages: X Windows System Default GNOME Desktop Environment Default Graphical Internet Deselect gaim and xchat Text Based Internet Cadaver and elinks only Office Productivity Deselect all. Sound/Video Default Graphics Default, deselect gimp help Server Configuration Tools All Web Server Default (for testing purposes only) Mail Server Default (for testing purposes only) Windows File Server Select All DNS Default (for testing purposes only) FTP Default (for testing purposes only) Network Servers Select DHCP servers (for testing only) Development Tools Default X Software Development Default GNOME Software Development Default Legacy Software Development Default Administrative Tools Select All System Tools Deselect ethereal, nmap, screen, vnc) Printing Support Default
Post Installation Configuration Display Settings - As required User Account - Add separate user
Once all configured, start the linux virtual machine. In order to talk to the windows host you will now need to set up Samba file sharing;
Create some directories to share i.e. mkdir /VA_Tools (for tools) & mkdir /Results (For all results ;-)
Use the command: system-config-samba to bring up the gui interface for share creation.
Add the VA_Tools and Results shares (ensuring in the preferences that user share security is enabled and the workgroup the laptop is assigned to is the same on the linux host) and assign what users may access.
Assign Samba passwords to users i.e. smbpaswd -a (for the root user)
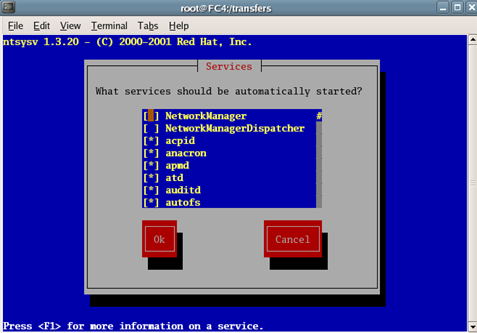
Run setup command
Scroll to System Services and:
Deselect:
Select: smb
service smb start will start the Samba service on the host and to check the syntax of the smb.conf (samba) file type testparm /etc/samba/smb.conf and hopefully no errors will come back.
Type smbclient -L \\localhost and insert password and hopefully a list of all available samba shares will be displayed.
vi /etc/samba/smb.conf and insert ; comments on the home directories and printer shares for added security.
Test the connectivity with the windows host now to ensure you can write to these shares and transfer documents.
A quirk of vmware is that by default a Linux host will not accept an external DHCP address when bridged. A jink around this is to insert the following syntax at the end of the: /etc/sysconfig/network-scripts/ifcfg-eth0 file:
check_link_down () { return 1; }
This is especially important is you are using ICS to update your VM host.
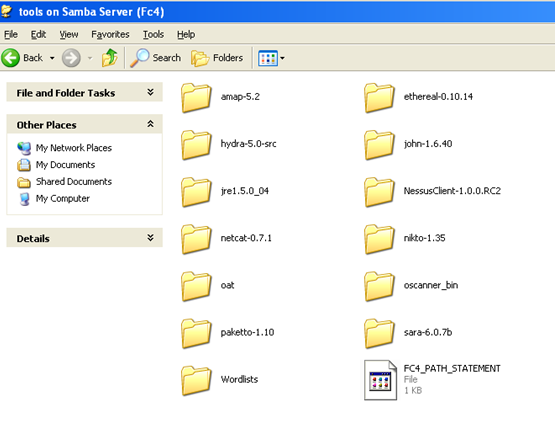
Once all this is working copy all tools from the windows host (or direct from the internet) into the VA_Tools folder and start building (see other pages). You will also need java, especially for the Oracle tools (notably Oscanner which does not work with the usual java executable in fc4. Once downloaded the java file, if not an rpm will need to be installed. (Usually by chmod 744 java_filename to make it executable and then running the command ./java_filename).
I usually install the latest versions of:
Nmap Nmapfe Ethereal Ettercap X-probe2 Firewalk Nikto Netcat Paketto Oscanner_bin Oat SARA Metasploit Java Amap Hydra John-the-ripper (including wordlists) etc. Nessus NessusClient
Note:- Nessus reports that its performance is abysmal running in VMWare. This is mostly in NAT based scenarios. I will agree that Nessus will not run as fast in VMWare as on a separate host, but if you are running windows and linux tools from the same box at the same time, the time trade-off in my mind is definitely worth it. You could of course dual boot, but the ability to snapshot, suspend etc. is also a great bonus.
One other useful thing to do is to amend the path statement in Linux, (edit the path in your .bash_profile file), to add the direct route to the executables in the above files and keep a copy of the path in your VA_Tools folder so you can easily amend when upgrading tools:
PATH=/usr/kerberos/sbin:/usr/kerberos/bin:/usr/local/sbin:/usr/local/bin:/sbin: /bin:/usr/sbin:/usr/bin:/usr/X11R6/bin:/root/bin:/VA_Tools/amap5.3:/VA_Tools/ hydra-5.3-src:/VA_Tools/ethereal.0.99:/VA_Tools/paketto-1.10/src:/opt/ nessus/sbinNessusClient-1.0.0.RC5/nessus
or you could place soft links in a directory already listed in the $PATH to save extra searching being carried out by the OS.
Hopefully now, you will have a stable build with a nice bunch of working tools. You can now tie the VM host down further by wither enabling SELinux and allow certain exemptions i.e. Samba, add TCP wrapper and Xinetd rules and ensure the firewall is enabled to ensure the system is a secure testing bed.
Oh yeah, don't forget to patch, FC4 was released quite a few months ago and a number of holes in the OS and apps need addressing (quite a few!):
Hopefully you will then be able to use up2date normally.
Note: - Up2date is now deprecated and has been replaced by pup, I'd stick with command line and yum though, most extensible
I hope this guide has been helpful to you and although basic hopefully will keep things simple.
Linux VMWare 5* problems
I've encountered problems installing VMWare 5 on Linux after running the vmware-config.pl script. I get the report vmnet0 bridging [FAILED]. To overcome this problem, (as VMWare will not start will not start until this is fixed), you need to download the vmware-any-any.tar.gz file and untar it and run the script runme.pl. After this has been run, you can then issue the command vmware-config.pl and the FAILED message will not be displayed and VMWare will run normally.
| IT Security News:
Pen Testing Framework:
Latest Tool Reviews:
|
| © VulnerabilityAssessment.co.uk 27 February 2008 |
|

